I wanted to change my cabin air filter the other night since I realized I haven’t changed it at all and I have 106,000 miles on the car. Needless to say I was a bit behind on changing this and got tired of tree particles and dirt flying out the vents occasionally.
Now the filter was only $18.99 at AutoZone so I picked one up and went to the car to change it. Figured it couldn’t be that bad since I’ve done Jamie’s care before and hers was two screws and done.
What a pain! This was a horribly annoying process of removing paneling, the entire glove box, and a bracket. Since I had such a tough time finding directions online I figured I would post them. It wasn’t difficult to change it, just more of a pain than anything else so don’t be discouraged. It’s $18.99 for an air filter change if you do it yourself versus over $100 somewhere else since it’s a good half hour or more labor charge if you take it anywhere else.
Give yourself 30-60 minutes and a little patience and you will get it done. First time it will be annoying since you are just figuring out how everything goes together, but the next time will be much easier I promise.
- Remove the glove box
- Remove these panels first to get to the screw locations for the glove box
- Dashboard center lower panel (small square one under radio, snaps off from bottom, no screws)
- Passenger side fuse panel (pops off, no screws)
- Panel under dashboard (3 screws in total to get this panel off, 2 in fuse panel and 1 under radio area)
- Remove the 4 screws holding the bottom of the glove box
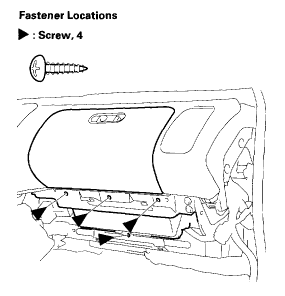
- Insert a flat head screwdriver in the notch (A) of the cap (B), and release the hooks by prying up the cap.
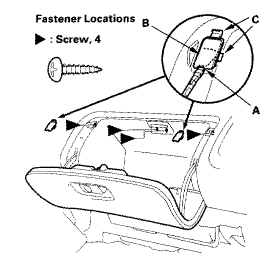
- Remove 4 screws. 1 under each cap you just pried up and 2 on top near the U shaped metal bar where the lock snaps in for the glove box.
- Pull down and towards you from the U shaped metal bar to start removing the glove box. It may be tight and feel like it’s not coming out but it eventually will as long as you didn’t miss a screw. Eventually you will see a connector on the left side (C), remove that.
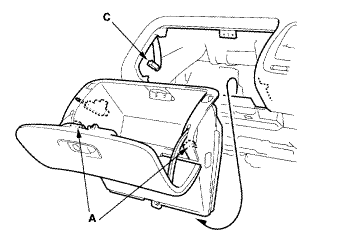
- Remove these panels first to get to the screw locations for the glove box
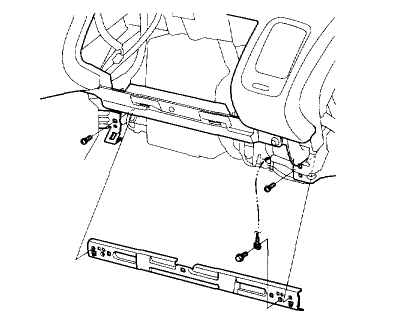
- Now with the glove box out, remove the 2 screws in the glove box frame to remove the frame.
You may have to remove the bolt with the wire attached to it if you don’t have enough slack just to get the frame out of the way of the filter box cover. I had enough to just let it dangle.
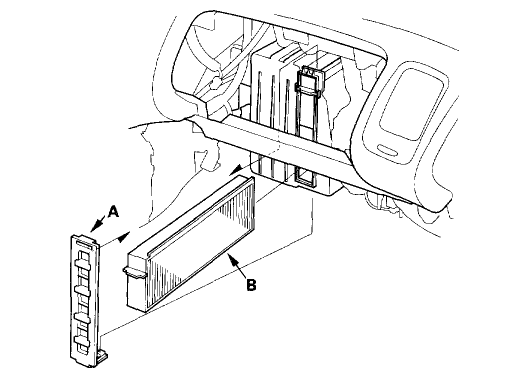
- Remove the filter lid (A) by lifting up the tab on the top and pulling to towards you. Then pull out the lower filter assembly (B), and then the upper filter assembly.
Make sure you remember the air flow direction, this is important! (If you forget the arrow points left)
- Remove the filter (A) from the filter housing (B). Place new filter into housing following the correct air flow direction.
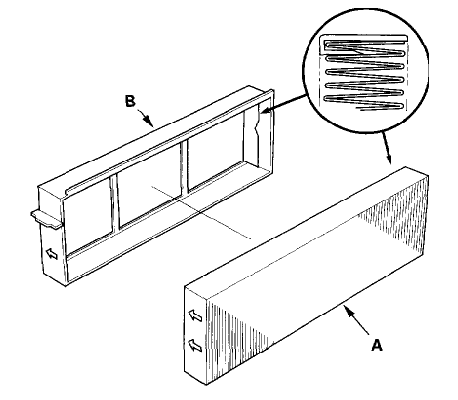
- Install the new filter assembly in the same way you took it out, just reverse. It doesn’t matter which one is on top, just put in one, lift it up and put in the next one.
- Reassemble glove box frame, glove box, and paneling in the reverse order you took it off.
If you have any questions feel free to post them here!
Credit and thanks to www.autorepair.about.com and www.alldata.com for the images and directions.
That’s awesome. Thank you for posting!
Helpful Post!! Thanks for sharing it.
Great I hope my air bag doesn’t deploy